Woodworking - Stacked Pumpkin Yard Decorations
Now that the garage shop is getting cooler I’ve been wanting to get out there and work on a project. I have some 4’x3′ plywood panels that I’ve been holding on to and wanted to build something cool for the upcoming spooky season – Halloween. Searching around online I found some interesting ideas and came across a post listing a bunch of interesting pumpkin designs and found this one to play around with.
Going from Photo to drawing


I’m not that great of an artist but I do have a knack for technology and I knew that if I could get this design into a scaleable format I could turn it into something I could print and put on the wood to trace and cutout.
Vectormator
I had this app on my iPad called Vectormator that I could use to trace out this image. This isn’t a tutorial on how to use Vectormator but after looking around online I found this great tutorial you could follow to get the same result.
Once I traced and changed the design to my liking and knowing that me hand cutting this out none of it would be perfect I needed to take this design and make something I could trace.
Rasterbater
I’ve used this website Rasterbater years ago to make a giant image I could put on a wall or something. The Rasterbater enlarges images to multiple pages. Print and combine them into huge posters.
Export the file from Vectormator in the largest file size tou can and then upload the image to Rasterbater and specify the number of pages you want it to use. You’ll notice at the bottom right is the paper size and dimensions. Try the different output settings so you can get the one that works for you.

After this you can print the pages and line the up. If you select the Page Position checkbox it will put a number at the bottom corner you can use to put them in the correct order.
I tried a few times and had to waste some paper until I could get the settings correct


Much like Ms. Marvel I said embiggen and sure enough I had the correct size.
Sticking it to the wood
Using Super77 spray glue I sprayed on the wood and on the paper and glued it to the wood. This stuff is easy to remove and if you mess up you can remove it, spray it and put it back on.
Time to cut it out
Using my Ryobi jigsaw I began cutting out the wood tracing the lines as best as I could. For the cut outs in the middle (eyes, nose & mouth) I drilled a hole that is bigger than the size of the jigsaw bit.


Sanding
I sanded this a bit using my Ryobi sander to knock down the pokey parts and make it easier to manage.


Time to paint
We purchased some orange spray paint and laid down some plastic on our work surface and began painting. I did 3 coats and it turned out nice and 1 coat of clear to “seal” it.


Lights
I went with 100 orange string lights from Walmart and used my staple gun to staple them to the wood. If you do staple into the wire on accident just remove it and it should be ok since the wires inside are stranded usually.

Mounting
I had these mounting key holes from a previous project and thought it would be a good idea to give this a go. I drilled 2 holes bigger than the bottom of the keyhole size and then mounted the keyhole on top of those 2 holes. Easy! I did end up putting my mount further down the piece between the top pumpkin and the second one since the top was a bit more fragile. Which brings me to actually mounting this on the wall. I tried this a few times and found that the lights on the back were not laying flush so I took 2 pieces of 2×4 and put one i the space between the top and middle pumpkin and another one between the middle and bottom pumpkin and that give me enough space to do it. Like I wrote earlier I had to ditch the mounting option (pictures below) and used the spot between the top and middle one for the keyhole mount.

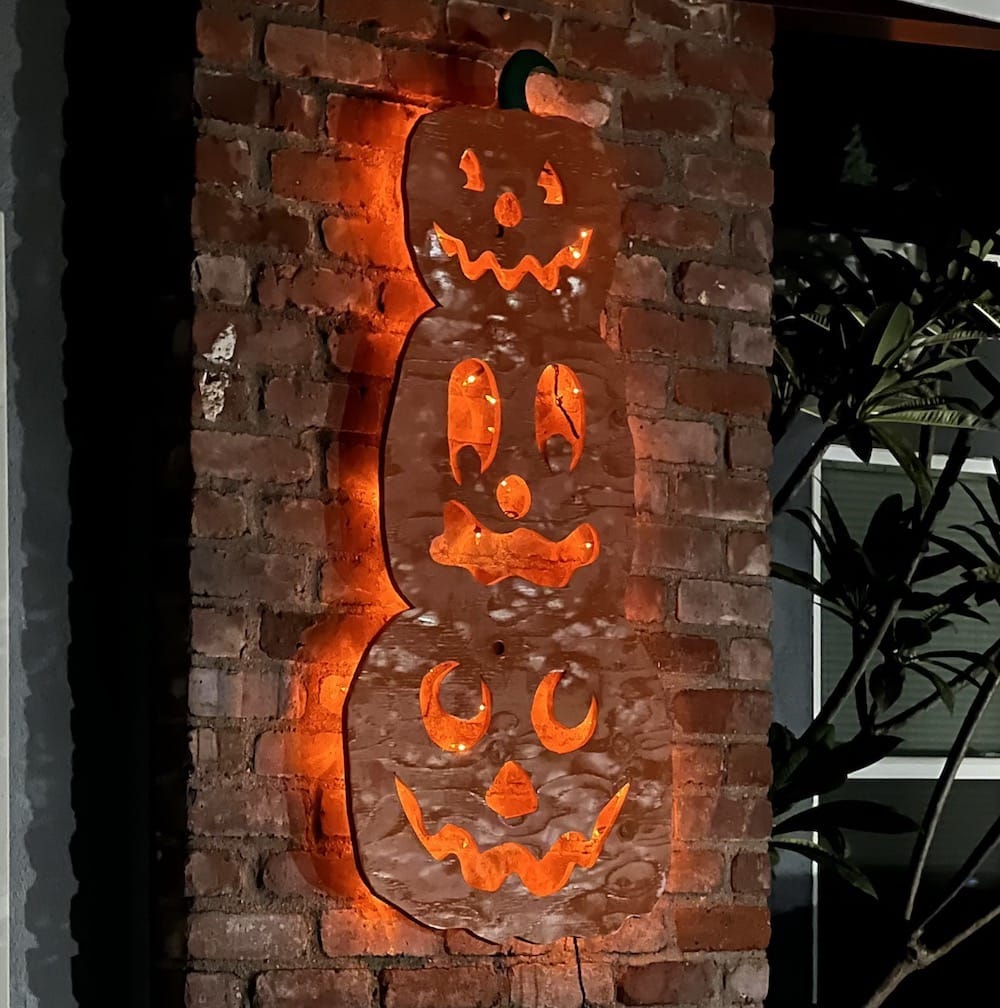
Finished Product